As a newsletter publisher, it’s easy to get caught up in the creative side of sending emails. After all, high-quality content is the bread and butter of your publication. However, it’s also crucial to keep up with the technical side of email marketing, from sender reputation to authentication protocols. BIMI is an authentication standard designed to indicate whether an email came from a trusted sender by displaying an official company logo. This solution intends to prevent cyber attacks by giving email users a way to identify fraudulent emails.
As of June 2023, only 0.14% of the world’s top domains use BIMI. But considering it was just introduced in 2019, that’s pretty impressive. And we expect BIMI to keep gaining traction.
Let’s talk about BIMI, what it is, why it matters, and how to set it up for your newsletter.
What is BIMI?
BIMI (pronounced bih-mee, according to the BIMI Group website), is an acronym for Brand Indicators for Message Identification. The authentication method was created by the AuthIndicators Working Group, an organization founded in 2015 that consists of companies including Google, Verizon Media, Comcast and LinkedIn.
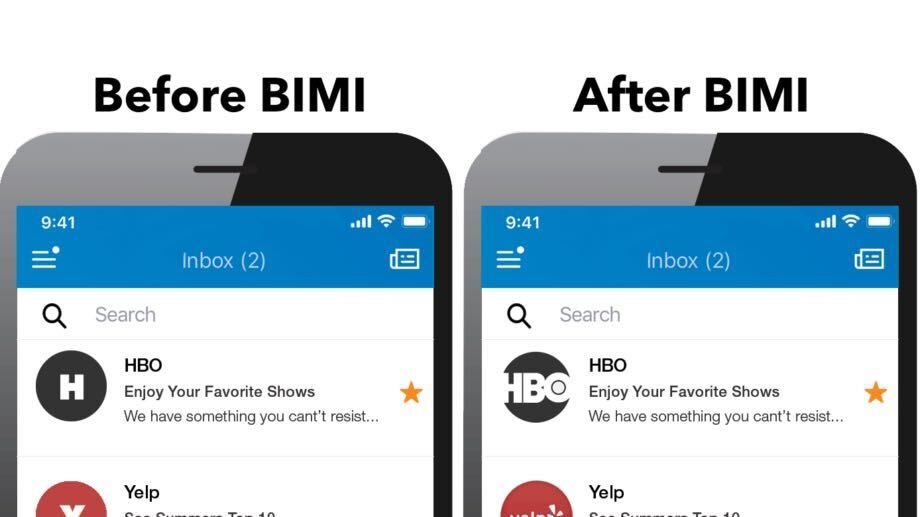
Individual email senders can implement BIMI to display their brand-specific logo next to messages they send. Unlike protocols like SPF, DKIM and DMARC, BIMI allows users to access an email’s authentication status through whether or not a logo is displayed. This can improve recipient trust and even raise engagement and open rates, according to some studies. Additionally, BIMI can give emails an extra layer of verification, like Gmail's blue checkmark.
Why does it matter?
Despite email’s reputation as an established communication channel, the number of users still continues to climb. According to some estimates, the figure is projected to climb to 4.4 billion by 2024. Unfortunately, email also tends to be a favorite tool for scammers. Verizon’s 2021 Data Breach Investigations Report found that 96% of phishing attacks are executed via email.
Many ESPs aim to protect users by using the spam filter to block suspicious emails. However, some fraudulent messages still manage to slip through the cracks. As BIMI undergoes more widespread adoption, users will have access to another security measure to distinguish between verified and unverified emails.
How does it work?
In order to work, BIMI relies on the email authentication processes we mentioned earlier: SPF, DKIM and DMARC.
- •Sender Policy Framework (SPF): checks the sender’s email address against approved list specified by the domain owner
- •DomainKeys Identified Mail (DKIM): adds a signature to a sender’s email to verify to ESPs that the message was sent from the correct domain
- •Domain-based Message Authentication, Reporting, and Conformance (DMARC): instructs ESPs on how to handle an email based on the results from SPF and DKIM
While it involves a lot of factors, the BIMI process is relatively straightforward:
- When a BIMI-supporting mailbox provider receives an email, the receiving server will perform several validation protocols, including SPF, DKIM and DMARC authentication
- Once the email is authenticated, the receiver will perform a DNS lookup to find a BIMI text record
- If the BIMI text record is valid, the provider will retrieve your logo and display it in the recipient’s email inbox
Keep in mind that not every email service provider supports BIMI. To find out where your logo will show up, check out the BIMI Group website for a full list of BIMI-supporting ESPs, including AOL, Google, FastMail and Yahoo!
Some ESPs also require a Verified Mark Certificate (VMC) in order to mark a sender as BIMI-compliant. This digital certificate confirms that your organization owns your logo’s trademark. While it’s optional for most mailbox providers, some marketers claim that it can help your email deliverability.
How can it benefit your newsletter?
While BIMI was primarily designed to protect email recipients, it can provide an advantage for publishers as well. Setting up BIMI can unlock three main benefits for newsletters:
1. Improve brand visibility
It may seem odd to try to market to your own subscribers. After all, they’ve already signed up to receive your emails. Unfortunately, a crowded inbox makes it easy for a newsletter to get lost in the shuffle. Many publishers already employ strategies like send time optimization and subject line testing to help grab readers’ attention. Similarly, BIMI can help your emails stand out in the inbox and position your brand at the forefront of your subscribers’ minds.
2. Earn subscriber trust
With the prevalence of spoofing and phishing attacks, many of us are taught to be weary of emails we receive. BIMI can give your subscribers confidence in your email messages, even when they diverge from your regular content. By prioritizing email security for your readers, you can create positive brand associations while simultaneously increasing opens.
3. Boost deliverability rates
Email authentication experts are quick to point out that simply implementing the BIMI standard will not guarantee every one of your emails will reach the inbox. However, just like any authentication protocol, BIMI will indicate to email service providers that your messages are trustworthy. On top of that, your increased opens will raise your sender reputation over time.
It’s important to note that spam filters may work differently depending on the provider. Therefore, make sure to practice healthy habits regardless of whether you’ve set up authentication protocols. That may include sending high-quality emails, using double opt-ins and cleaning up your email list on a regular basis.
How to set up BIMI in 4 steps
Setting up BIMI doesn’t take much time, but it can have long-term benefits for your newsletter.
In fact, you can pull off the setup process in just four steps:
1. Ensure full DMARC compliance
As previously mentioned, BIMI relies on your domain’s existing DMARC policy. Therefore, you’ll have to access your DNS records and make sure that your authentication protocols are all set up correctly. If you need some help with this step, check out Google Support’s guides to implementing SPF, DKIM and DMARC.
Once you’ve set up your records, make sure your DMARC record is either sending unverified emails to spam or rejecting them altogether (p=quarantine or p=reject). Finally, make sure your instructions apply to 100% of messages (pct=100).
2. Create a compliant logo
At this point in the setup process, you should have decided what you want to display next to your emails. If not, now is probably not the time to pilot a new design. Choose a recognizable brand logo that your subscribers will be able to identify quickly.
Your image must also meet a few basic specifications, including:
- Square dimensions
- No larger than 32KB
- Non-transparent background in SVG format
- Solid color (recommended)
Once you’ve settled on a logo, you’ll have to format it to be used with BIMI. In order to be BIMI-compliant, your image must be in SVG Tiny P/S format. If you have an SVG Tiny 1.2 file ready to go, BIMI Group has released a set of conversion tools to simplify the process.
Acquire a Verified Mark Certificate (VMC) or a new Common Mark Certificate (CMC)
After you’ve created your BIMI-compliant logo, you’ll want to acquire confirmation that the image belongs to your organization. Having a VMC is required for some ESPs, including Gmail, in order for BIMI to work. However, many believe that more providers will start making it mandatory over time.
In order to get a VMC, your BIMI logo must be trademarked with an official intellectual property office. If you’re not sure, you can search for it on the World Intellectual Property Organization's (WIPO) database. If you haven’t registered for a trademark yet, the United States Patent and Trademark Office (USPTO) offers some helpful resources about the process. Once you’ve verified your trademark, you can purchase a VMC through a certificate authority such as Entrust or Digicert.
If you haven’t secured a verified trademark yet, you can use a Common Mark Certificate (CMC). This new option makes it easier to implement BIMI without needing an expensive logo trademark or patent, as long as you’ve been using your logo for at least a year.
3. Publish a BIMI record in DNS
After you’ve finalized your logo, it’s time to go back into your domain’s DNS records and make it official. Log back into your DNS provider and create a new TXT record at the default._bimi subdomain. Then, add a value including your BIMI version and the location of your logo. Once you save the record, you should be set.
For a more detailed guide on how to create your BIMI record, check out this article from MX Toolbox.
4. Check to see if everything is set up correctly
Once you’ve gone through the steps of setting up your BIMI, you’ll want to make sure it’s working properly. Look up your domain name using a BIMI inspector to get a free audit report. Keep in mind that your BIMI may take up to 48 hours to process after saving.
Final thoughts
As more inbox providers begin to prioritize security, authentication protocols like BIMI will become widespread in the email industry. By setting up BIMI now, you can get ahead of the curve.
Check out the Paved blog to learn more about how to improve your newsletter.